TimeClock: Difference between revisions
David Ashton (talk | contribs) |
David Ashton (talk | contribs) No edit summary |
||
| Line 3: | Line 3: | ||
# On iPad, open Settings. On left hand side, scroll down to LinkPOS and select to view LinkPOS settings. | # On iPad, open Settings. On left hand side, scroll down to LinkPOS and select to view LinkPOS settings. | ||
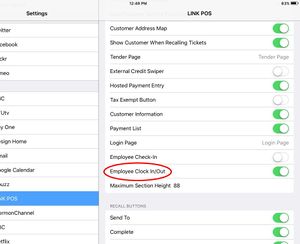
# On right side of screen, scroll down to section titled “Visible Options”. Scroll down to bottom of section and turn tab green for “Employee Clock In/Out”. Close Settings.[[File:Employee Clock In Out.jpg|frameless]] | # On right side of screen, scroll down to section titled “Visible Options”. Scroll down to bottom of section and turn tab green for “Employee Clock In/Out”. Close Settings.<br>[[File:Employee Clock In Out.jpg|frameless]] | ||
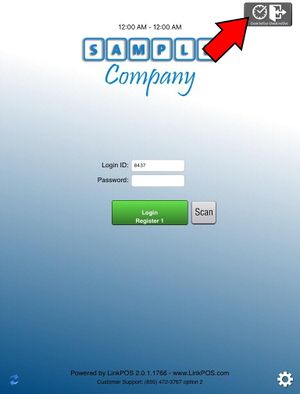
# Open LinkPOS application. The timeclock will now be displayed on the upper right hand corner of the login screen of the application. Tap the box to enter.[[File:Clock In-Out Login Screen.jpg|frameless]] | # Open LinkPOS application. The timeclock will now be displayed on the upper right hand corner of the login screen of the application. Tap the box to enter.<br>[[File:Clock In-Out Login Screen.jpg|frameless]] | ||
= Using the Timeclock = | = Using the Timeclock = | ||
| Line 26: | Line 26: | ||
# Open browser with LinkPOS web portal: [https://linkpos.net linkpos.net]. Login. | # Open browser with LinkPOS web portal: [https://linkpos.net linkpos.net]. Login. | ||
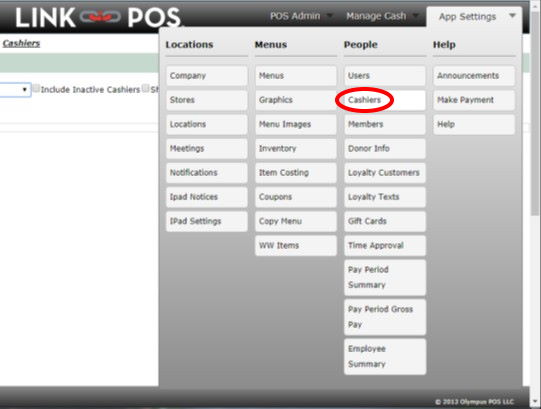
# Select App Settings → Cashiers to add additional timeclock users:[[File:Cashiers_Menu.jpg|none|frame]] | # Select App Settings → Cashiers to add additional timeclock users:<br>[[File:Cashiers_Menu.jpg|none|frame]] | ||
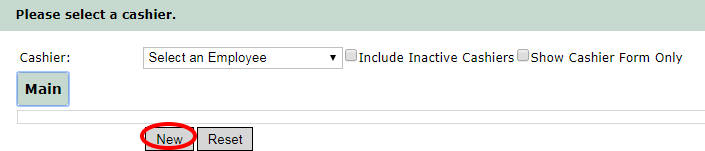
# Select New to create a new employee record for the timeclock:[[File:New_Employee.png|none|frame]] | # Select New to create a new employee record for the timeclock:<br>[[File:New_Employee.png|none|frame]] | ||
# Complete all required fields marked by *. Scroll down to complete all, there are more at the bottom of the page. | # Complete all required fields marked by *. Scroll down to complete all, there are more at the bottom of the page. | ||
# Select any additional desired options for the employee access. | # Select any additional desired options for the employee access. | ||
Revision as of 17:06, 31 August 2022
Setting up the Application
- On iPad, open Settings. On left hand side, scroll down to LinkPOS and select to view LinkPOS settings.
- On right side of screen, scroll down to section titled “Visible Options”. Scroll down to bottom of section and turn tab green for “Employee Clock In/Out”. Close Settings.
- Open LinkPOS application. The timeclock will now be displayed on the upper right hand corner of the login screen of the application. Tap the box to enter.


Using the Timeclock

- Select the employee name. Enter their password (will be the same password used as on the LinkPOS login screen). Select clock-in or clock-out.
- An employee must be set up as a Cashier on the web portal or they will not be able to use the LinkPOS timeclock.
- Once the punch is complete, select “Cancel” to return to the main screen.
Options:
- Print on Clock-Out – print hours accrued for the day.
- Print Pay Period – print hours from pay period.
- Projects – multiple projects can be created on the web portal for tracking payroll/hours according to the needs of the business.
Adding Timeclock Users
- Open browser with LinkPOS web portal: linkpos.net. Login.
- Select App Settings → Cashiers to add additional timeclock users:
- Select New to create a new employee record for the timeclock:
- Complete all required fields marked by *. Scroll down to complete all, there are more at the bottom of the page.
- Select any additional desired options for the employee access.
- Note: this is also the same place to enter a new user for the application, whether or not they are using the timeclock.
- Additional questions on the specific box items can be answered by our Support Team via email or phone.
- Once the required and additional fields desired have been completed, click Save. The newly created Cashier should then appear in the drop down box for Cashiers.
- If edits are needed for an existing employee cashier record, select the employee name from the drop down box. Review selections, make changes, and save.


Time Approval
- Time Approval is used by owners and managers to review and approve time punch records by employees. It should be done on a regular basis to ensure accuracy.
- Time punch records cannot be deleted due to liability and auditing. However, the records can be edited through the Hours field on the Time Approval page:
- To “zero” out a punch, change the Hours field to 0. Save.
- To change a punch, edit the Hours field. Save.
- We recommend adding a note to any edit explaining the reason why it was made.
- Time Approval can be done by Employee, by Pay Period, or by Date Range.
- New Time Records can be added on this page for hours or specific timeclock punches.
- To approve hours, ensure all boxes in the approve column are checked for approval and select Approve All.
- To view previously approved hours, select “Show Approved Records”, date range, pay period and/or employee, then Preview.
Reporting
All reports are located on the web portal at App Settings → People
Pay Period Summary
- Provides summary of pay period hours for all employees in table format. Can be exported to Excel as .csv file.
- Shows regular hours (rounded to nearest quarter hour) versus project hours (unrounded hours).
Pay Period Gross Pay
- Useful for viewing hours, pay rate and gross pay for a pay period. Pay rates must be maintained under the different cashiers for this to be correct.
Employee Summary
- Useful for seeing a single employee’s pay period at a glance. Will show which days have approved, new (unapproved) or no punches. Select any date to see the specific punches for that day.
- Once a date is selected, a punch can be added or approved.