Printer Configuration
Star Micronics Printer Configuration
The printers must have static IP addresses. Below are the steps to follow to assign a printer a static IP address.
You can use a web browser or telnet to configure the printer to use a static IP address.
Print out the IP address of the printer
- Make sure the printer is plugged in to power
- Make sure an ethernet cable is plugged in to the back of the printer and into the router.
- Make sure the printer has paper.
- Turn the printer off.
- Press and hold the Feed button.
- Turn the printer on.
- The printer will start up and make a noise or a beep. At this point let go of the Feed button.
- The printer will print out two sheets of paper. The second sheet will have the IP address and other network settings on it.
Configure from a Web Browser
- Use an iPad or a laptop on the same network as the printer.
- Bring up the web browser.
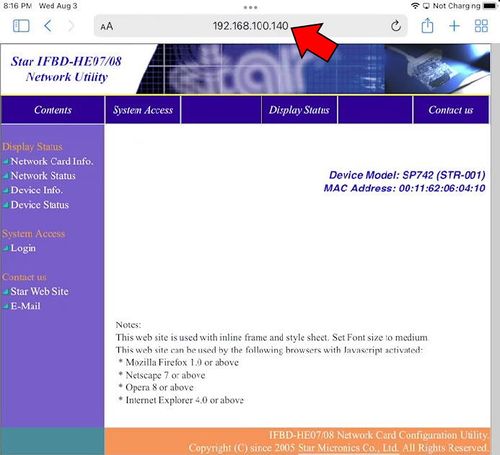
- In the address bar enter the IP address of the printer and hit enter. This will bring up the printer network utility page.

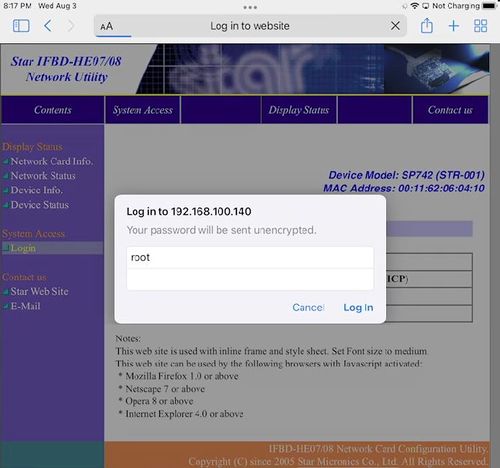
- Touch Login. username = root, password = public

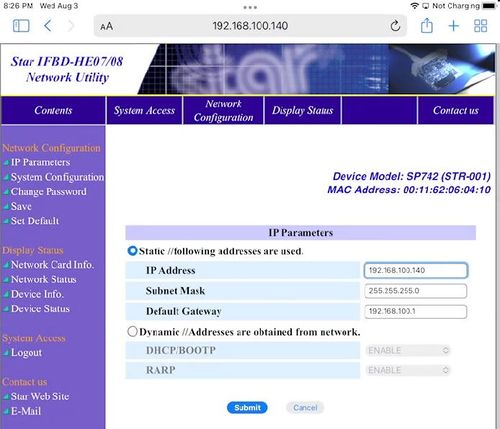
- Select Network Configuration :: IP Parameters
- Select Static
- Enter the IP address: 192.168.1.200
- The IP address must be unique for each printer. We suggest using numbers after the last dot like 200, 201, etc.
- Enter the Subnet mask: 255.255.255.0
- Enter the default gateway: 192.168.1.1
- Then touch Submit to save the new configuration.

We are assuming that your network is 192.168.1.xxx. If you have another network like 172.16.1.xxx or 10.10.1.xxx enter those numbers instead of 192.168.1.xxx in the above steps.
Configure using Telnet
In order to configure a printer using telnet you need to have a computer connected to the same network as the printer and you have to have telnet installed. On a Windows computer you can install Putty to get the telnet application.
- Connect the printer to power.
- Connect the printer to an Apple Airport Extreme Router via Ethernet cable
- Turn off the printer.
- Push and hold the feed button on the front of the printer while you turn the printer back on. Hold the feed button until a piece of paper prints.
- Two papers should print and at the bottom of the second paper you will find the current IP address.
- On your computer open CMD and type: telnet (enter the printer’s current IP address which is found on the bottom of the paper that just printed. Something like 192.168.1.100) Then hit Enter.
- Login: root
- Password: public
- Type 1 and hit Enter for IP Parameters Configuration
- Type 1 for Static and hit Enter
- Type 1 for IP Address and hit Enter
- Type in the new IP address (172.16.1.200 or above) and hit Enter
- Type 2 for Subnet Mask and hit Enter
- Type in the Subnet Mask: 255.255.255.0 and hit Enter
- Type 3 for Default Gateway and hit Enter
- Type in the Default Gateway: 172.16.1.1 and hit Enter
- Type 99 for Back to IP Address Menu and hit Enter
- Type 99 for Back to Main Menu and hit Enter
- Type 98 for Save and Restart and hit Enter
- Type 1 for Save and Restart Device & Configuration Printing
o A new sheet of paper should have printed out with the new IP Address settings.
How to Reset a TSP 100 Printer (thermal printer)
Before you begin, ensure that the printer is both connected to power and stocked with paper
There are two ways to reset the TSP 100 printer. You can use the feed button or the dip switches.
Feed button reset
- Turn off the printer.
- Open the paper hatch and leave it open.
- Press and hold the Feed button. With the Feed button pressed turn on the printer.
- Hold the Feed button until the Ready and Error lights begin to blink blue and red.
- Release the Feed button.
- Close the paper hatch.
- Turn the printer off and then back on.
- The printer is now reset to DHCP mode.
To ensure the printer has been reset, follow the instructions in the previous section to print out the IP address of the printer.
Dip switches reset
- Turn the printer off and unplug the power cable from the wall.
- Unplug the ethernet cable from the back of the printer.
- Turn the printer over and take off the plate on the bottom (it’s the only plate with a screw, and there is only one screw)
- Using a paperclip, turn all four dip switches to the off position.
- Turn the printer right side up.
- Plug the power cable back into the wall.
- Press and hold the Feed button and turn on the printer.
- After a second when the printer makes a noise, release the Feed button.
- The printer will print out two sheets of paper. The IP address on the second sheet should be 0.0.0.0
- Turn the printer off and unplug the power cable again.
- Turn all four dip switches back to the on position.
- Reattach the plate.
- Plug the ethernet cable back into the printer.
- Plug the power cable back into the wall.
- Press and hold the Feed button and turn on the printer.
- After a second when the printer makes a noise, release the Feed button.
- The printer will print out two sheets of paper. This time the IP address should be a valid non-zero value.
- The printer is now reset and you are free to configure it to use a static IP address (see instructions above)
How to Reset a TSP 700 Printer (impact printer)
Before you begin, ensure that the printer is connected to power, ethernet is plugged in to the back, and is stocked with paper.
- While the printer is turned on, use a paper clip or other narrow object to push and hold the button on the back of the printer labeled SW. Hold that button for 1-5 seconds until you see the green and red lights flash regularly. There is a sequence. The lights should flash and then the green lights should flash and then the red lights should flash and then both lights should flash.
- Once both lights are flashing, release the button.
- Then press and release the SW button again. Just a normal button press. Don't hold the button down. This will turn off the red and green lights.
- You’re done! With the lights off, the printer will reboot itself automatically.
To ensure the printer has been reset, follow the instructions in the previous section to print out the IP address of the printer.
How to Reset a TSP 650 Printer (old thermal printer)
Before you begin, ensure that the printer is connected to power, ethernet is plugged in to the back, and is stocked with paper.
- While the printer is turned on, use a paper clip or other narrow object to push and hold the red button on the back of the printer. Hold that button for 1-5 seconds until you see the green and red lights flash regularly.
- Once both lights are flashing, release the button.
- Then press and release the red button again. Just a normal button press. Don't hold the button down. This will turn off the red and green lights.
- You’re done! With the lights off, the printer will reboot and the lights will come back on.
To ensure the printer has been reset, follow the instructions in the previous section to print out the IP address of the printer.