New Hire Employees
Revision as of 13:24, 25 February 2023 by David Ashton (talk | contribs) (Created page with "LinkPOS has made new hire employee set up easier and faster for employers through the “New Employee” feature. == Step 1: Send the employee an enrollment email == === All Employers === * Employers can start the new employee set up process by logging to to our web portal at linkpos.net and selecting the following: App Settings -> People -> New Employee * Once the New Employee function is selected, a box for an email address will appear. The employer will enter th...")
LinkPOS has made new hire employee set up easier and faster for employers through the “New Employee” feature.
Step 1: Send the employee an enrollment email
All Employers
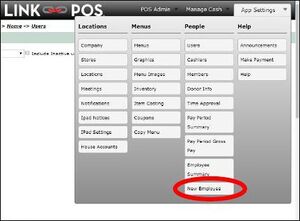
- Employers can start the new employee set up process by logging to to our web portal at linkpos.net and selecting the following: App Settings -> People -> New Employee
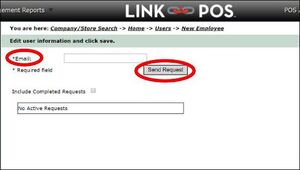
- Once the New Employee function is selected, a box for an email address will appear. The employer will enter the new hire employee’s email address, then click the ‘Send Request’ gray box. This will send the new employee an email with a link to begin their employee setup.
- Employers will also see a table on the New Employee setup page, for employees with pending setup status or missing documents. Clicking the “Include Completed Requests” box will add all completed employees to the table.
- NOTE: LinkPOS does not send out multiple reminder emails once this process has been started; management of New Hire Employee setups is managed at each company’s discretion.
- To view Completed Employee Setup requests, click the “Include Completed Requests” check box
Employees will receive an email within five minutes of the employer entering the employee’s email address on linkpos.net on the New Employee page.
NOTE: if an employee has not received the email, we recommend checking the Spam/Junk folders of the email address the request was sent to.
- The email sender will show as follows: Company Name <registration@linkpos.net> on behalf of Company Name <email address listed for store receipt emails>
- The email title will show as follows: Employee enrollment request from Company Name
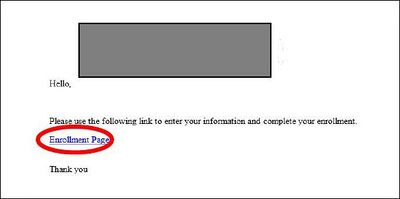
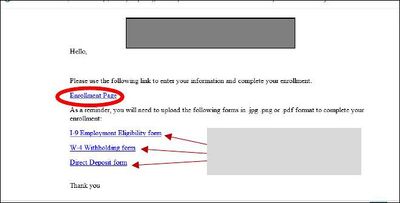
- The email will show a company logo, and instruct the employee to click on the included link to begin their enrollment and provide necessary documents (if company is a LinkPOS Payroll Client; Timeclock only clients do not need to provide this information to LinkPOS).
- The email link will open a web browser to a web page (shown right) for the employee to begin their new hire set up.
Step 2: Employee enters Information through link provided in email
Timeclock Only LinkPOS Client Employee
The company sending the employee set up request is a Timeclock Only Client, processing their payroll outside of LinkPOS.
- Click the “Start Enrollment” button.
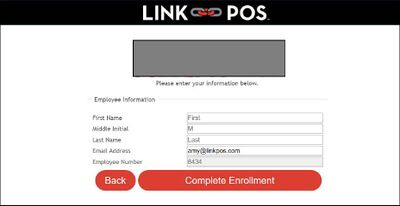
- The employee will enter their first name, middle initial (optional), and last name in the appropriate fields.
- The employee email address will be automatically populated using the email provided by the employer for the enrollment request. It can be changed during this step, if desired.
- The employee / cashier number will be auto populated by LinkPOS. (Employers can later change an employee / cashier number by visiting the employee’s individual Cashier page on linkpos.net after setup is completed.)
- Select “Complete Enrollment”. The employee will see a message “Your store manager has been notified by email that your enrollment is complete. Thank you!”
