Create a new device: Difference between revisions
David Ashton (talk | contribs) (Created page with "# Touch "Create a new device" frameless|400x400px # Select the device type you want to create. frameless|400x400px # Confirm you want to create a register by touching Next. frameless|400x400px # Enter a unique register number and then touch Create. frameless|400x400px") |
David Ashton (talk | contribs) No edit summary |
||
| (2 intermediate revisions by the same user not shown) | |||
| Line 1: | Line 1: | ||
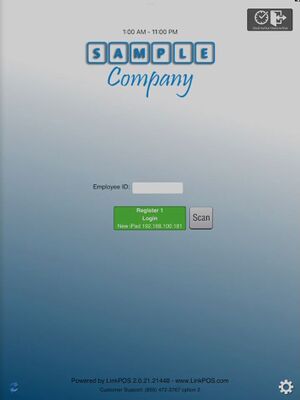
# Touch "Create a new device" [[File: | # Touch "Create a new device" [[File:1_create_device.jpg|center|frameless|400x400px]] | ||
# Select the device type you want to create. [[File: | # Select the device type you want to create. [[File:2_device_types_list.jpg|center|frameless|400x400px]] | ||
# Confirm you want to create a register by touching Next. [[File: | # Confirm you want to create a register by touching Next. [[File:3_register_device.jpg|center|frameless|400x400px]] | ||
# Enter a unique register number and then touch Create. [[File: | # Enter a unique register number and then touch Create. [[File:4_confirm_configuration.jpg|center|frameless|400x400px]] | ||
# If a warning dialog comes up then the register you are trying to create already exists. Hit cancel and enter a unique register number before touching Create again. [[File:7 replace existing device.jpg|center|400x400px]] | |||
# The settings are loaded and then the app goes to the login screen. You can now use the new device. | |||
[[File:8 login screen.jpg|center|400x400px]] | |||
== LinkPOS app access rights == | |||
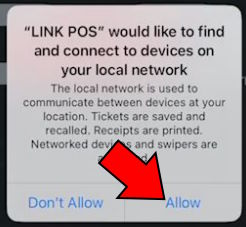
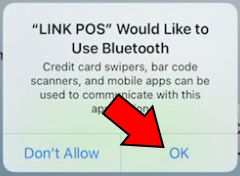
[[File:Allow local network.jpg]][[File:Use bluetooth.jpg]] | |||
During installation and when running the app for the first time it will ask for several permissions. You must enable all of them in order for the app to function. You can select "Only while using the app" but you must enable all of the permissions. The app must have access to the network in order to communicate with other devices and printers. The app must have access to Bluetooth in order to communicate with credit card devices and printers. The app must have access to location in order to accept online orders. Online orders can only be accepted if there is an iPad turned on at the location of the store to ensure that the order taken will be fulfilled. The app must have access to the camera in order to scan QR and bar codes on receipts, coupons, and loyalty cards. If you selected no to any of these requests you can go to the iPad settings app, select LinkPOS, and turn access to those permissions back on. | |||
Latest revision as of 16:35, 20 September 2023
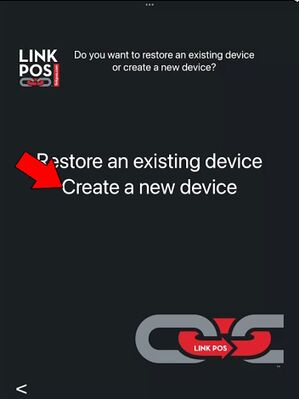
- Touch "Create a new device"
- Select the device type you want to create.
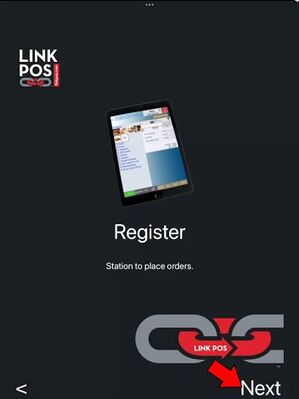
- Confirm you want to create a register by touching Next.
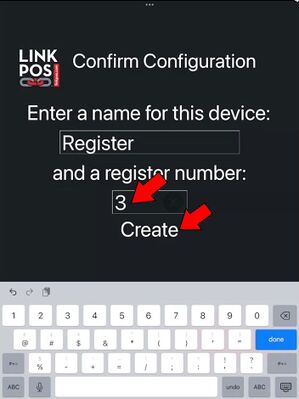
- Enter a unique register number and then touch Create.
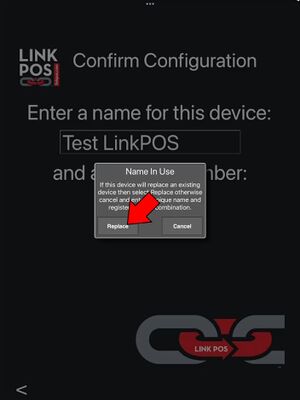
- If a warning dialog comes up then the register you are trying to create already exists. Hit cancel and enter a unique register number before touching Create again.
- The settings are loaded and then the app goes to the login screen. You can now use the new device.
LinkPOS app access rights
During installation and when running the app for the first time it will ask for several permissions. You must enable all of them in order for the app to function. You can select "Only while using the app" but you must enable all of the permissions. The app must have access to the network in order to communicate with other devices and printers. The app must have access to Bluetooth in order to communicate with credit card devices and printers. The app must have access to location in order to accept online orders. Online orders can only be accepted if there is an iPad turned on at the location of the store to ensure that the order taken will be fulfilled. The app must have access to the camera in order to scan QR and bar codes on receipts, coupons, and loyalty cards. If you selected no to any of these requests you can go to the iPad settings app, select LinkPOS, and turn access to those permissions back on.
